Autoscaling clusters with Ray
This post explores how The Ray Cluster works. To demonstrate how to speed up compute by using Ray Clusters, this post will perform a compute-intensive image processing task (palette extraction) on a large dataset (thousands of movie posters).
Over the last few decades, the computational demand of applications has grown exponentially. This has been enabled by Moore’s law, which suggests that hardware compute capacity doubles every two years. Nevertheless, in recent years, growth in this capacity has slowed down dramatically to the point that Moore’s law is now considered dead. On the other hand, with the rise of big data and machine learning, applications need more resources than ever before. Because scaling up vertically is no longer an option, modern data systems rely on horizontal scaling to meet the demand, and distributed computing is becoming the norm rather than the exception.
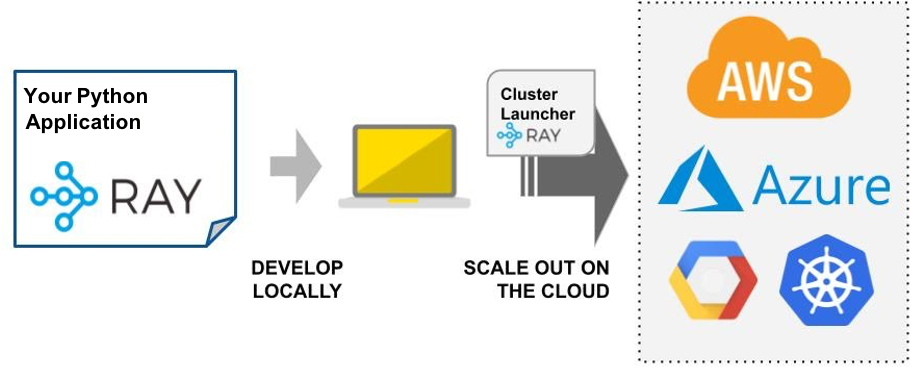
Writing and deploying a distributed application in a self-managed cluster is hard. To tackle this problem, Ray provides a simple, universal API for building distributed applications. Applications that use Ray can also benefit from Ray Clusters, which provide users with a serverless experience. Clusters can automatically scale up and down based on an application’s resource demands while maximizing utilization and minimizing costs. This enables efficient resource allocation — compute capacity in Ray is provisioned to match the exact resource demands of the user’s application. Figure 1 shows a typical workflow for building a Ray application.
 Figure 1: Example Ray application
Unlike proprietary serverless offerings by cloud service providers, Ray is open-source and compatible with all commonly used cloud providers. Thus, Ray is suitable for a multi-cloud strategy and its use does not create any vendor lock-in. Ray also only depends on basic compute instances, which makes it cheaper to operate than packaged serverless offerings sold as services.
This blog post explores how The Ray Cluster works. To demonstrate how to speed up compute by using Ray Clusters, this blog will perform a compute-intensive image processing task (palette extraction) on a large dataset (thousands of movie posters).
LinkThe Ray Cluster
Why use The Ray Cluster?
When writing a distributed application, one can expect that a certain task will require some resources to run, for example, CPUs or GPUs. When the application needs a resource, it’s best if it is readily available without having to think about making it available beforehand (or disposing of it once it’s no longer needed). Ray Clusters solve this problem. They manage the scheduling of all the resources that a Ray application might need. Most importantly, Ray does this completely automatically based on the application’s resource demand via the Ray Autoscaler, which you can learn more about in this YouTube video.
To use the Ray Autoscaler, a series of node types have to be configured. These are the instance types that will be scheduled when the demand arises. The Ray Autoscaler then keeps track of the application’s resource demands and knows exactly when it needs to start or stop new nodes that will satisfy the application’s requirements. By using the Ray Autoscaler, the complexity of the application is significantly reduced — the application no longer has to incorporate any logic related to starting and stopping VMs, replicating data, recovering from failure, etc. At the same time, the application can scale up and down precisely while minimizing the infrastructure costs associated with running it.
How does The Ray Cluster work?
The easiest way to start a Ray cluster is by using the Ray CLI in combination with a cluster definition called the cluster YAML. First, from the CLI, Ray will use the Ray Cluster Launcher to launch the head node of the cluster. To do this, the Cluster Launcher looks at the cluster definition, which specifies a provider configuration to determine where to launch the cluster (e.g., cloud, region). The YAML also includes all the available_node_types for the cluster and, in particular, a head_node_type among them. This configuration will determine the type of VM that will be provisioned for the head node.
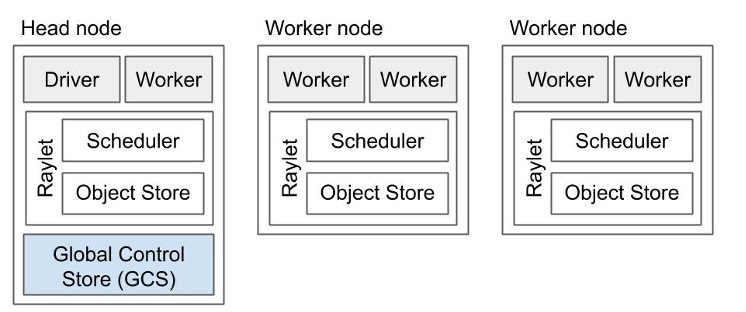
The head node is special because it will be managing the cluster through the Ray Autoscaler: it will be responsible for syncing files and starting other nodes-known as workers-when the application demands resources and stopping these nodes when they become idle. Figure 2 shows an example of a cluster with 2 worker nodes.
 Figure 2: Example of a Ray cluster architecture with 2 worker nodes.
Each node type, including the head node and the workers, provides a collection of resources (e.g., 4 CPUs per node), which can be specified in the definition or automatically detected based on the VM type (currently only supported for AWS or Kubernetes). With the correct understanding of the resources provided by each node, and with the demands coming from the application, the Ray Autoscaler is able to determine when it needs to add nodes. Conversely, if available resources exceed the requirements of the application rendering some nodes idle, the Autoscaler will shut down such nodes. To avoid shutting down nodes too quickly, the Ray Autoscaler waits for an idle_timeout_minutes as set up in the cluster YAML before nodes are shut down.
In addition to the zero-to-infinity elasticity provided by the Autoscaler’s resource scheduler, sometimes it is preferable to change the boundaries and define a number of min_workers and max_workers for each node type. For a given node type, the former will tell the Autoscaler to always maintain a minimum number of workers of this type, and the later will cap the number of nodes of this type that the Autoscaler can start. By default, these are set to zero and the global max_workers, respectively. The global max_workers must be set to cap the total number of nodes of any type.
LinkConfiguring a Ray Cluster
Let’s look at a sample cluster definition to see these concepts in practice:
1cluster_name: autoscaler_demo
2
3max_workers: 30
4
5docker:
6    image: "rayproject/ray:latest-cpu"
7    container_name: "ray_container"
8
9provider:
10    type: aws
11    region: us-west-1
12
13available_node_types:
14    default:
15        resources: {}
16        node_config:
17            InstanceType: m5.4xlarge
18
19head_node_type: default
20
21file_mounts:
22    "~/data": "./data"
23
24head_setup_commands: []
25
26setup_commands:
27    - pip install tqdm colorthief
28
Save this as `cluster.yaml`. Here’s a description of what the code is doing:
It creates a cluster named `autoscaler_demo`.
It specifies that the cluster will have at most 30 workers.
Cluster nodes will run the `rayproject/ray:latest-cpu` image in containers named “ray_container” using Docker
The cluster will be deployed on `aws` in the `us-west-2` region.
There will be only a single node type available. This node type is called “default,” its resources will be auto-filled by the autoscaler, and it will use m5.4xlarge instances.
Files in the local directory “./data” will be mounted to the remote directory on each node at the path “~/data.”
Nodes will run a setup command to install the Python packages “tqdm” (for a progress bar) and “colorthief” (for the palette extraction).
LinkRay Cluster lifecycle
Setup
Before we begin deploying our code, we need to set things up so Ray can start and stop VMs in our cloud of choice. For this demo, we will use AWS, but the Ray docs provide information about how to do this in Azure, GCP and Kubernetes. First, let’s make sure the right dependencies are installed by running `pip install -U ray boto3`.
Now let’s make sure the credentials are available to Ray. Credentials can be defined in `~/.aws/credentials` as described in the AWS docs, or configured as environment variables (by using `export` for `AWS_ACCESS_KEY_ID`, `AWS_SECRET_ACCESS_KEY` and `AWS_SESSION_TOKEN`).
Launching and autoscaling
To start the Ray Cluster, run `ray up -y cluster.yaml`. As discussed earlier, this will launch the head node, which is of type `default_node_type`. The cluster is ready, but before we start working on an application, let’s quickly go through some important actions one can take.
Monitoring
There are 3 main ways to monitor the cluster:
Dashboard: Ray provides a dashboard that listens on port 8265. Running `ray dashboard cluster.yaml` will forward the Ray dashboard running remotely to run locally (at “localhost:8265”) and open it up in the browser. An example of the Ray Dashboard is shown on Figure 3.
Logs: Sometimes it’s useful to see the Autoscaler logs. One can SSH into the head node using `ray attach cluster.yaml` to run any command, including tailing the logs (they are at `/tmp/ray/session_latest/logs/monitor*`). To just see the logs, one can also call `ray monitor cluster.yaml` or `ray exec cluster.yaml 'tail -n 100 -f /tmp/ray/session_latest/logs/monitor*'`.
Tags: One can see all the instances managed by the Autoscaler in the cloud service providers console because they are tagged with the `ray-node-status` tag.
 Figure 3: Ray’s built-in dashboard provides metrics, charts, and other features that help Ray users to understand Ray clusters and libraries.
Shutting down
Once the Ray cluster is no longer needed, it can be shut down by calling `ray down cluster.yaml`. Don’t do this yet since we will need the cluster to run the demo application below!
LinkDemo app
Basic application
For this demo, we will be building a simple application that extracts the color palette from an image dataset containing movie posters. Figure 4 shows the rendered output of processing a single sample (to simplify the demo, we will not be storing or rendering the output, but as an exercise you can add this functionality to the application).
 Figure 4: Rendered output of processing a single sample.
In this section, let’s go through the code that would be written if we just wanted to run this on a single process.
Before we begin, the following dependencies have to be installed:
1pip install -U tqdm colorthiefOur working directory contains the following:
An `assets` directory containing all the images
An `ids.json` file containing the ids for all the images we want to analyze (from the `assets` directory)
The first thing we would like to do is load up the ids from the JSON file, which is done by a method called `get_image_ids`:
1import json
2import time
3import io
4import os
5from tqdm import tqdm
6from colorthief import ColorThief
7
8def get_image_ids():
9    with open(os.path.expanduser("~/data/ids.json")) as f:
10        IMAGE_IDS = json.load(f)
11    return IMAGE_IDS
12
13ids = get_image_ids()
14
15def load_image(image_id):
16    with open(os.path.expanduser(f"~/data/assets/{image_id}.jpg"), 'rb') as f:
17        return io.BytesIO(f.read())
We can then define another method called `get_palette` to extract the palette using the `ColortThief` class. This method relies on a separate method called `load_image` that loads up the image so it can be processed by the `ColorThief` `get_palette` class method:
1def get_palette(image_id):
2    return ColorThief(load_image(image_id)).get_palette(color_count=6)
Finally, we can loop through the image ids sequentially. Our code also uses the `tqdm` package to show a progress bar and outputs the total processing time at the end:
1start = time.time()
2palettes = []
3
4for img_id in tqdm(ids):
5    palettes.append(get_palette(img_id))
6
7print("Finished {} images in {}s.".format(len(ids), time.time() - start))
Save this as `palettes.py` and `python palettes.py` to run it.
We notice that the progress is relatively slow, because palette extraction is a compute-intensive operation. In our test, we were achieving a performance of 2-3 images/second. With 134,000 images to process, this job would take 12.4-18.6 hours to complete!
Adding Ray
We can improve the performance to take advantage of multiple cores in the machine by tweaking a few lines to incorporate Ray and parallelize the processing.
First, we need to `import ray` and use `ray.init()` to initialize it. We also have to add the `@ray.remote` decorator to create a Ray task from the method whose execution we want to parallelize (in this case, `get_palette`).
1import ray
2ray.init(address='auto')
3
4@ray.remote
5def get_palette(image_id):
6    return ColorThief(load_image(image_id)).get_palette(color_count=6)
Second, we need to modify our loop to asynchronously execute the `get_palette` task by using `get_palette.remote`, instead of calling the function directly. We will also modify the use of `tqdm` to update not based on iterations of the loop, but rather based on the progress of the resolution of asynchronous Ray tasks.
1start = time.time()
2palettes = []
3
4for img_id in ids:
5    palettes.append(get_palette.remote(img_id))
6
7def progress_bar(obj_refs):
8    ready = []
9    with tqdm(total=len(obj_refs)) as pbar:
10        while len(obj_refs) > 0:
11            new_ready, obj_refs = ray.wait(obj_refs, num_returns=10)
12            pbar.update(len(new_ready))
13            ready.extend(new_ready)
14    return ready
15
16palettes = ray.get(progress_bar(palettes))
17print("Finished {} images in {}s.".format(len(ids), time.time() - start))
If we save this now as `palettes_ray.py` and run it using `python palettes_ray.py`, we should notice a significant improvement in performance. The number of iterations should grow almost proportionally to the number of cores the machine has. In our test with a 4-core machine, our speed increased to 6-8 iterations/second. This is still not sufficient to complete the task in a short amount of time!
LinkAdding Ray Clusters
We can unlock the full potential of Ray by taking advantage of Ray clusters, following these steps:
If the cluster isn’t running already, use the cluster.yaml file (run `ray up -y cluster.yaml`) described in the previous section,to start the cluster.
SSH into the head node by running `ray attach cluster.yaml`.
Since the application data (code and images) has been mounted to `~/data` due to the `file_mounts` configuration in the cluster.yaml, you need to switch to that directory by running `cd ~/data`.
Execute the application by running `python palettes_ray.py`.
After the task is complete, don’t forget to run `ray down cluster.yaml` to terminate all the resources created by Ray.
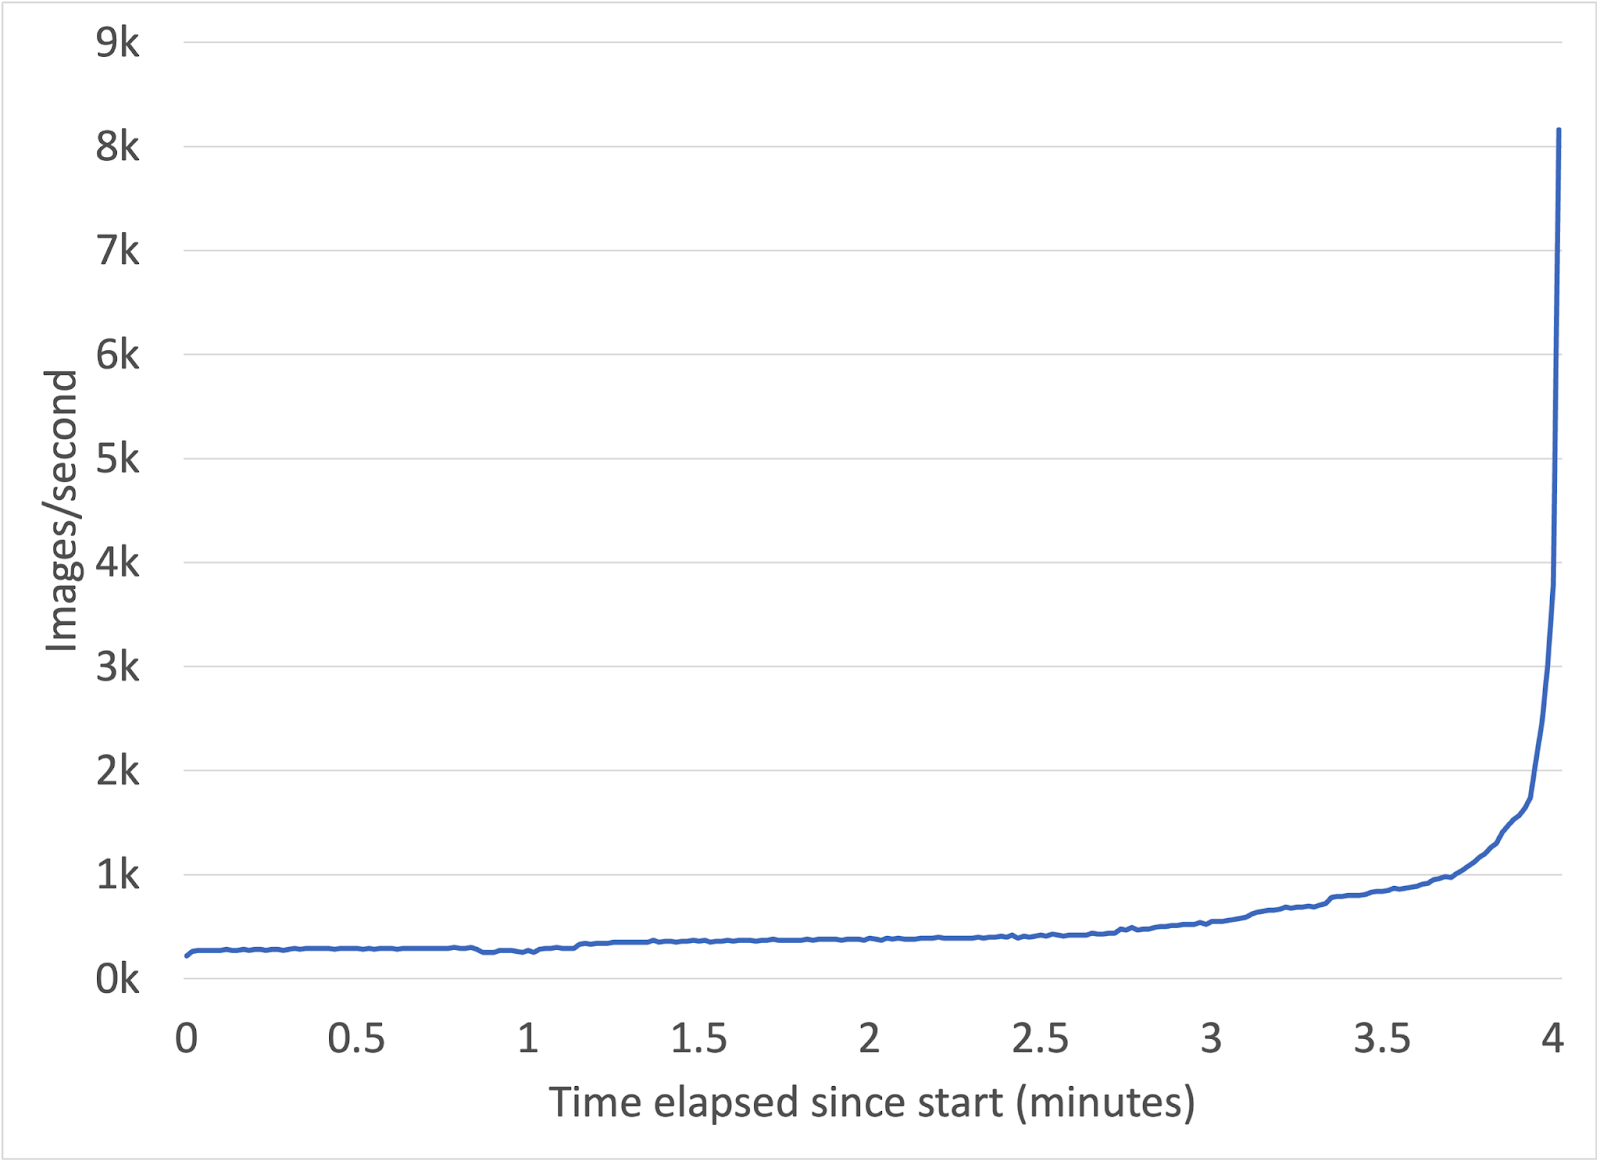
With Ray Clusters, we were able to complete the task in only 4 minutes. Figure 5 shows the images processed per second over elapsed time since the job was started. As the cluster scales up and more nodes are added, the processing accelerates towards the completion of the job.
 Figure 5: Images/second processed from job start until completion.
LinkConclusion
In this blog post, we showed how The Ray Cluster enables you to horizontally scale distributed applications. Using Ray, you can scale existing applications like our image processing job to a cluster with a few code changes. This allowed us to go through a large dataset in 4 minutes instead of 12-18 hours, without needing to build complex infrastructure.
Please check out the documentation for more details on Ray Clusters. If you’d like to learn more about Ray, we encourage you to check out the Ray Tutorials on Anyscale Academy and join the Ray forums. If you're interested in helping us improve Ray and its user experience, we're hiring!


