Building a Self Hosted Question Answering Service using LangChain + Ray in 20 minutes
This is part 3 of a blog series. In this blog, we’ll show you how to build an LLM question and answering service. In future parts, we will optimize the code and measure performance: cost, latency and throughput.
This blog post builds on Part 1 of our LangChain series, where we built a semantic search service in about 100 lines. Still, search is so … 2022. What if we wanted to build a self-hosted LLM question-answering service?
One option is we could just ask the LLM directly without any background at all. Unfortunately one of the biggest problems with LLMs is not just ignorance (“I don’t know”) but hallucination (“I think I know but I actually don’t at all.”) This is perhaps the biggest issue facing LLMs at the current time. The way we overcome that is by combining factual information from our search engine and the capabilities of an LLM together.
Again, as we demonstrated before, there is a powerful combination in Ray + LangChain. LangChain provides a chain that is well suited to this (Retrieval QA). To give a fuller picture of how the pieces come together, we’re going to implement some parts that could usually just as easily be wrapped.
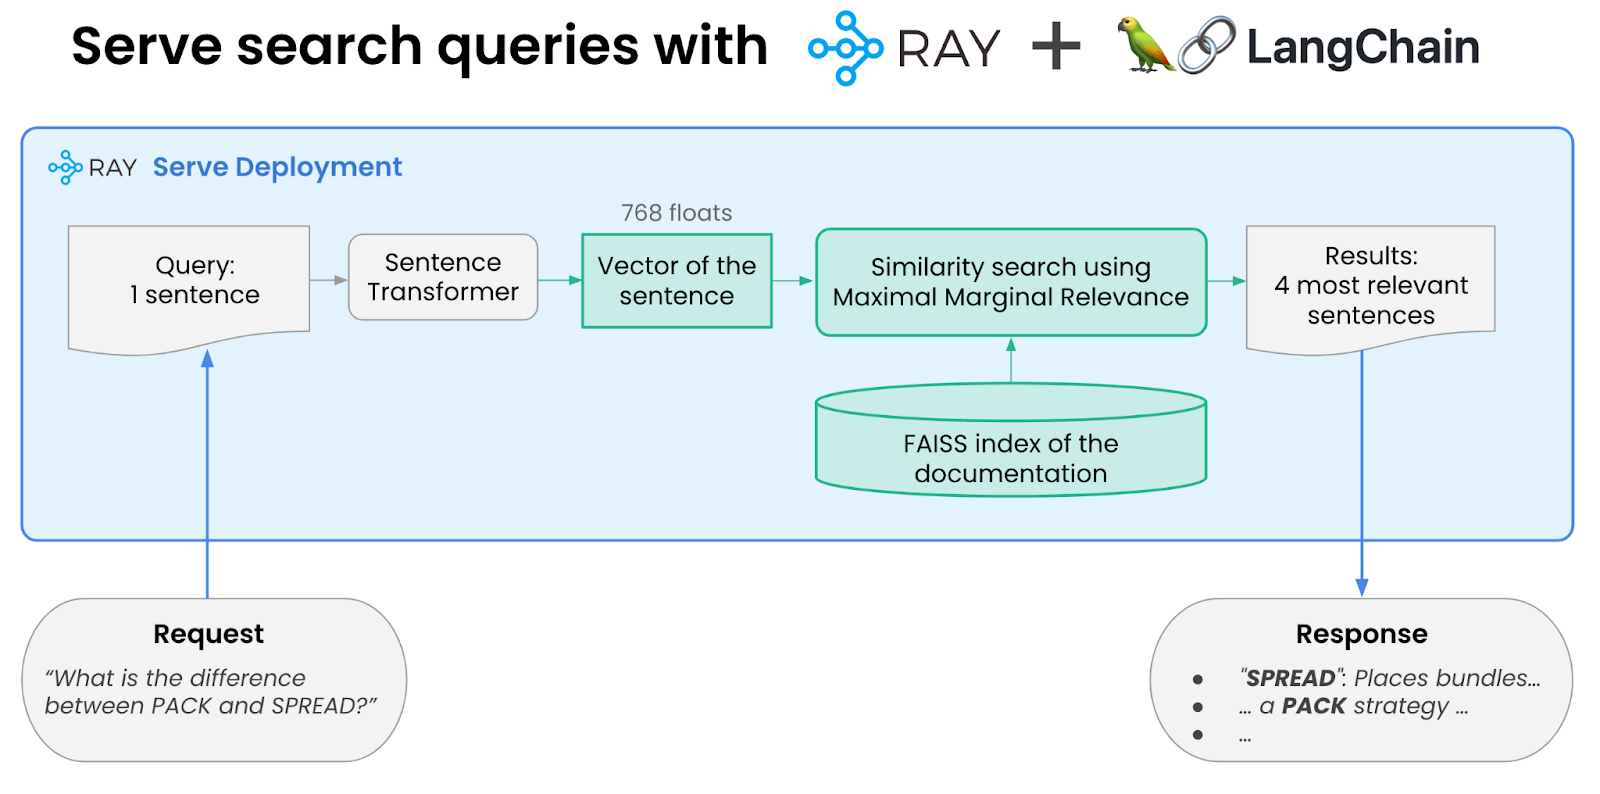
The Question Answering Service we will build will query the results from our Search Engine, and then use a self-hosted LLM to summarize the results of the search.
Previously we had shown this diagram for how to serve semantic search results:

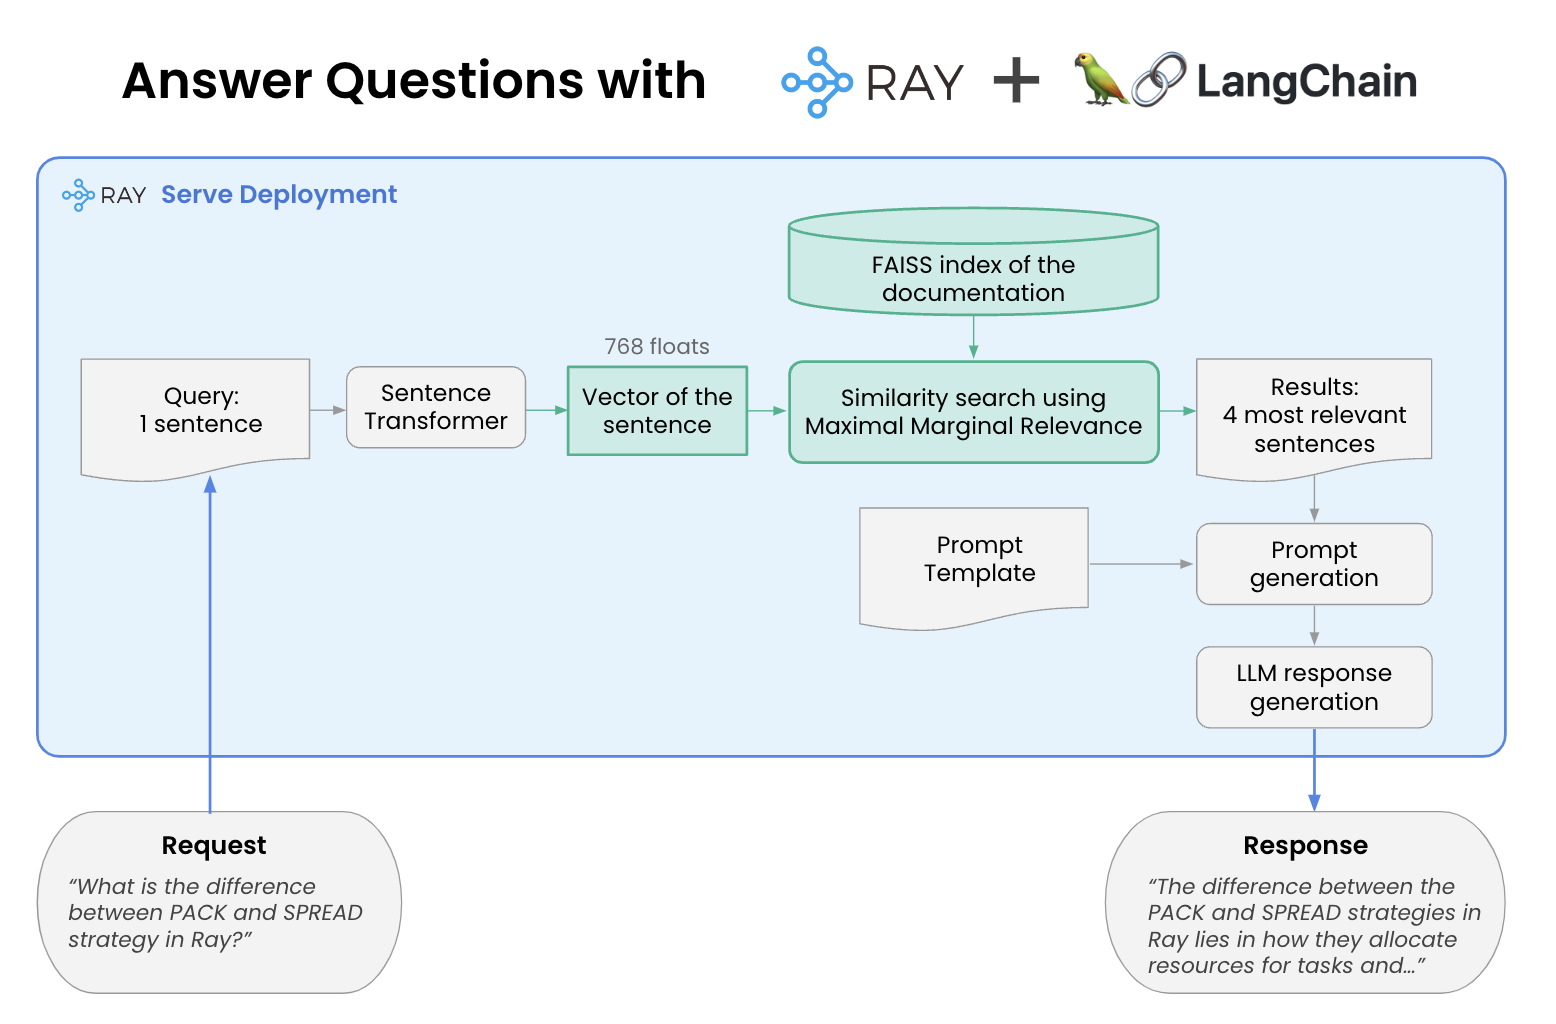
We are going to augment that now by creating a chain that consists of the above stage, then generating a prompt, and feeding that to an LLM to generate the answer.
Hence, the resulting system we are trying to build looks like this:

In other words, we take the vector search results, we take a prompt template, generate the prompt and then pass that to the LLM. Today we will use StableLM but you can easily swap in whatever model you want to.
Before we get started, it’s worth noting that you can find the source code to this project in our LangChain Ray examples repo at: https://github.com/ray-project/langchain-ray.
LinkStep 1: The Prompt Template
The prompt template is derived from the suggested one from StableLM, but modified for our use case.
In serve.py, we declare the following template:
1TEMPLATE = """
2<|SYSTEM|># StableLM Tuned (Alpha version)
3- You are a helpful, polite, fact-based agent for answering questions about Ray.
4- Your answers include enough detail for someone to follow through on your suggestions.
5<|USER|>
6
7Please answer the following question using the context provided. If you don't know the answer, just say that you don't know. Base your answer on the context below. Say "I don't know" if the answer does not appear to be in the context below.
8
9QUESTION: {question}
10CONTEXT:
11{context}
12
13ANSWER: <|ASSISTANT|>
14"""
Let’s go through the template. The first part is the “<|SYSTEM|>” tag. You can think of this as setting the “personality” of the LLM. LLMs are trained to treat the system tag differently. Not all LLMs support this, but OpenAI and StableLM do. The second part is the “<|USER|>” tag which is the question we want to ask. Note that the question and context are “templatized” – we will provide them from another source. Finally, since LLMs generate outputs by continuing on from the input, we say to the LLM “OK, here’s where you take over.”
The question will come from the user’s query. The context will use what we built last time: the search results from our semantic search.
LinkStep 2: Setting up the embeddings and the LLM
Now let’s have a look at the __init__ method for our deployment.
1def __init__(self):
2       #... the same code from Part 1 ..
3       self.llm = StableLMPipeline.from_model_id(model_id="stabilityai/stablelm-tuned-alpha-7b",
4                                                    task="text-generation", model_kwargs=
5                                                    {"device_map":"auto", "torch_dtype": torch.float16})
6       WandbTracer.init({"project": "wandb_prompts_2"})
7       self.chain = load_qa_chain(
8           llm=self.llm,
9           chain_type="stuff",
10           prompt=PROMPT)
As you can see, we’ve added just 3 lines.
The first line creates a new StableLM LLM. In this case we had to write a little bit of glue code because we wanted to specify using float16 (halving the memory consumption of the model). We are working with the authors of Langchain to make this unnecessary. The key line from that file is this one:
1 response = self.pipeline(prompt, temperature=0.1, max_new_tokens=256, do_sample=True)
2
Here we specify the maximum number of tokens, and that we want it to pretty much answer the question the same way every time, and that we want to do one word at a time.
The second line sets up our tracing with Weights and Biases. This is completely optional, but will allow us to visualize the input. You can find out more about Weights and Biases here.
The third thing we do is create a new chain that is specifically designed for answering questions. We specify the LLM to use, the prompt to use and finally the “chain type” – for now we set this to “stuff” but there are other options like “map_reduce”, and also pass in the prompt.
LinkStep 3: Respond to questions
We’ve now got our Langchain ready, now all we have to do is write the code that uses the chain to answer questions!
1   def answer_question(self, query):
2       search_results = self.db.similarity_search(query)
3       print(f'Results from db are: {search_results}')
4       result = self.chain({"input_documents": search_results, "question":query})
5
6       print(f'Result is: {result}')
7       return result["output_text"]
You’ll notice the first line is identical to our previous version. Now we execute the chain with both our search results and the question being fed into the template.
LinkStep 4: Go!
Now let’s get this started. If you’re using Weights and Biases, don’t forget to log in using wandb login. To start, let’s do serve run serve:deployment.
Now it’s started, let’s use a simple query script to test it.
1$ python query.py 'What are placement groups?'
2Placement groups are a way for users to group resources together and schedule tasks or actors on those resources. They allow users to reserve resources across multiple nodes and can be used for gang-scheduling actors or for spreading resources apart. Placement groups are represented by a list of bundles, which are used to group resources together and schedule tasks or actors. After the placement group is created, tasks or actors can be scheduled according to the placement group and even on individual bundles.
3
Yay! It works (well, mostly, that part at the end is a bit weird)! Let’s also check that it doesn’t make stuff up:
1$ python query.py 'How do I make fried rice?'
2I don't know.
3
Let’s just check the prompt that was sent to StableLM. This is where Weights and Biases comes in. Pulling up our interface we can find the prompt that was sent:
1<|SYSTEM|># StableLM Tuned (Alpha version)
2- You are a helpful, polite, fact-based agent for answering questions about Ray.
3- Your answers include enough detail for someone to follow through on your suggestions.
4<|USER|>
5If you don't know the answer, just say that you don't know. Don't try to make up an answer.
6
7Please answer the following question using the context provided.
8QUESTION: What are placement groups?
9CONTEXT:
10Placement Groups#
11Placement groups allow users to atomically reserve groups of resources across multiple nodes (i.e., gang scheduling).
12They can be then used to schedule Ray tasks and actors packed as close as possible for locality (PACK), or spread apart
13(SPREAD). Placement groups are generally used for gang-scheduling actors, but also support tasks.
14Here are some real-world use cases:
15
16ray list placement-groups provides the metadata and the scheduling state of the placement group.
17ray list placement-groups --detail provides statistics and scheduling state in a greater detail.
18Note
19State API is only available when you install Ray is with pip install "ray[default]"
20Inspect Placement Group Scheduling State#
21With the above tools, you can see the state of the placement group. The definition of states are specified in the following files:
22High level state
23Details
24
25Placement groups are represented by a list of bundles. For example, {"CPU": 1} * 4 means you’d like to reserve 4 bundles of 1 CPU (i.e., it reserves 4 CPUs).
26Bundles are then placed according to the placement strategies across nodes on the cluster.
27After the placement group is created, tasks or actors can be then scheduled according to the placement group and even on individual bundles.
28Create a Placement Group (Reserve Resources)#
29
30See the User Guide for Objects.
31Placement Groups#
32Placement groups allow users to atomically reserve groups of resources across multiple nodes (i.e., gang scheduling). They can be then used to schedule Ray tasks and actors packed as close as possible for locality (PACK), or spread apart (SPREAD). Placement groups are generally used for gang-scheduling actors, but also support tasks.
33See the User Guide for Placement Groups.
34Environment Dependencies#
35
36ANSWER: <|ASSISTANT|>
37
We can see the search results that we made in are being included. StableLM is then using this to synthesize its answer.
LinkConclusion
In this blog post we showed how we could build on the simple search engine we built in the previous blog in this series and make a retrieval-based question answering service. It didn’t need us to do much: we needed to bring up a new LLM (StableLM), we needed to generate a prompt with the search results in it, and then feed that result to the LLM asking it to derive an answer from it.
LinkNext Steps
Review the code and data used in this blog in the following Github repo.
If you are interested in learning more about Ray, see Ray.io and Docs.Ray.io.
See our earlier blog series on solving Generative AI infrastructure with Ray.
To connect with the Ray community join #LLM on the Ray Slack or our Discuss forum.
If you are interested in our Ray hosted service for ML Training and Serving, see Anyscale.com/Platform and click the 'Try it now' button
Ray Summit 2023: If you are interested to learn much more about how Ray can be used to build performant and scalable LLM applications and fine-tune/train/serve LLMs on Ray, join Ray Summit on September 18-20th! We have a set of great keynote speakers including John Schulman from OpenAI and Aidan Gomez from Cohere, community and tech talks about Ray as well as practical training focused on LLMs.

