Introducing Ray Lightning: Multi-node PyTorch Lightning training made easy
TL;DR: Use PyTorch Lightning with Ray to enable multi-node training and automatic cluster configuration with minimal code changes.

PyTorch Lightning is a library that provides a high-level interface for PyTorch, and helps you organize your code and reduce boilerplate. By abstracting away engineering code, it makes deep learning experiments easier to reproduce and improves developer productivity.
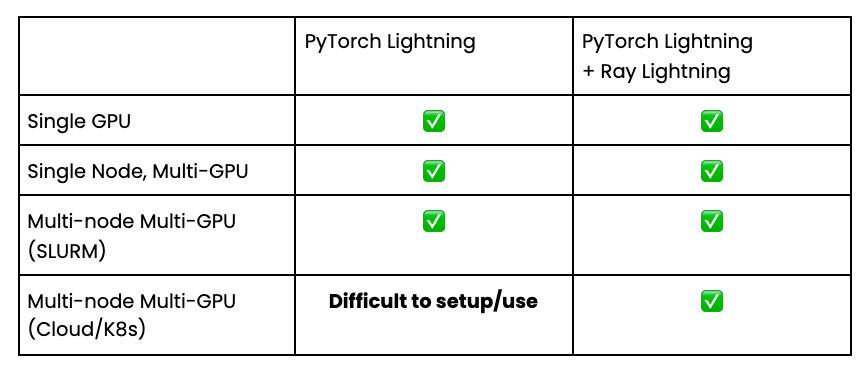
PyTorch Lightning also includes plugins to easily parallelize your training across multiple GPUs which you can read more about in this blog post. This parallel training, however, depends on a critical assumption: that you already have your GPU(s) set up and networked together in an efficient way for training.
While you may have a managed cluster like SLURM for multi-node training on the cloud, setting up the cluster and its configuration is no easy task. As described in this blog post configuring the cluster involves:
Making sure all the nodes in the cluster can communicate with each other
Making the code accessible to each node
Setting up the proper PyTorch environment variables on each node
Running the training script individually on each node.
Multi-node training with PyTorch Lightning has a couple of other limitations as as well:
Setting up a multi-node cluster on any cloud provider (AWS, Azure, GCP, or Kubernetes) requires a significant amount of expertise
Multi-node training is not possible if you want to use a Jupyter notebook
Automatically scaling your GPUs up / down to reduce costs will require a lot of infrastructure and custom tooling.

Wouldn’t it be great to be able to leverage multi-node training without needing extensive infrastructure expertise?
And wouldn’t it be even better if you could do so with no code changes?
LinkIntroducing Ray Lightning
Ray Lightning is a simple plugin for PyTorch Lightning to scale out your training. Here are the main benefits of Ray Lightning:
Simple setup. No changes to existing training code.
Easily scale up. You can write the same code for 1 GPU, and change 1 parameter to scale to a large cluster.
Works with Jupyter Notebook. Simply launch a Jupyter Notebook from the head node and access all the resources on your cluster.
Seamlessly create multi-node clusters on AWS/Azure/GCP via the Ray Cluster Launcher.
Integration with Ray Tune for large-scale distributed hyperparameter search and SOTA algorithms.
And best of all, it is fully open source and free to use!
Underneath the hood, Ray Lightning leverages Ray, a simple library for distributed computing in Python.
With Ray Lightning, scaling up your PyTorch Lightning training becomes much easier and much more flexible!
LinkHow does Ray Lightning work?
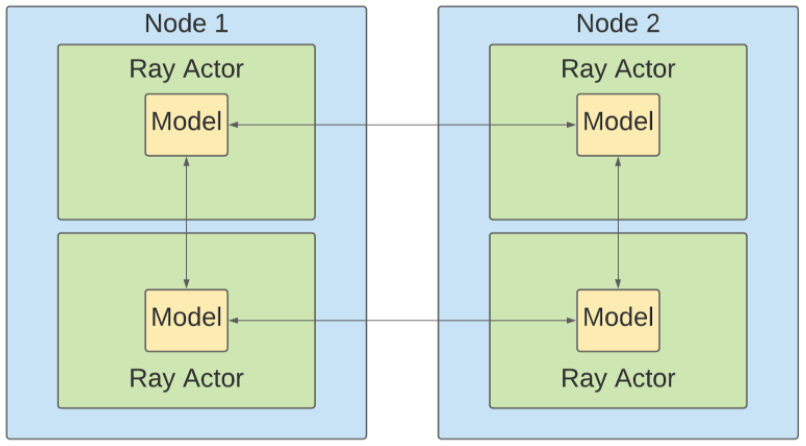
Ray Lightning uses the PyTorch Lightning “plugin” interface to offer a RayPlugin that you can add to your Trainer. It works similar to the built-in DDPSpawn Plugin that PyTorch Lightning has, but instead of spawning new processes for training, the RayPlugin creates new Ray Actors. These actors are just Python processes, except they can be scheduled anywhere on the Ray cluster, allowing you to do multi-node programming without leaving your Python script.
 Communication between Ray actors on multi-node cluster
Each Ray actor will contain a copy of your LightningModule and they will automatically set the proper environment variables and create the PyTorch communication group together. This means that underneath the hood, Ray is just running standard PyTorch DistributedDataParallel, giving you the same performance, but with Ray you can run your training job programmatically and automatically scale instances up and down as you train.
LinkManaging the Cluster
Typically, managing clusters can be a pain, especially if you don’t have an infra or ML platform team. But with Ray, this becomes very easy — you can start a Ray cluster with the Ray cluster launcher.
Ray’s cluster launcher supports all the major cloud providers (AWS, GCP, Azure) and also has a Kubernetes operator. So you can run your Ray program wherever you need. And once your code can run on a Ray cluster, migrating or changing clouds is easy.
To launch a Ray cluster on AWS for example, you need a cluster YAML file specifying configuration details like below:
1cluster_name: ml
2
3# Cloud-provider specific configuration.
4provider:
5    type: aws
6    region: us-west-2
7    availability_zone: us-west-2a,us-west-2b
8
9# How Ray will authenticate with newly launched nodes.
10auth:
11    ssh_user: ubuntu
12
13head_node:
14    InstanceType: p3.8xlarge
15    ImageId: latest_dlami
16
17    # You can provision additional disk space with a conf as follows
18    BlockDeviceMappings:
19        - DeviceName: /dev/sda1
20          Ebs:
21              VolumeSize: 100
22worker_nodes:
23    InstanceType: p3.2xlarge
24    ImageId: latest_dlami
25
26file_mounts: {
27    "/path1/on/remote/machine": "/path1/on/local/machine",
28}
29
30# List of shell commands to run to set up nodes.
31setup_commands:
32    - pip install -U ray-lightning
The information you put in file_mounts will be synced to all nodes in the cluster, so this is where you can put your training script. For any additional dependencies that you need to install, you can specify them (i.e. pip install foobar) in the setup_commands. They will be installed on all nodes in the cluster.
Once you have your YAML file, you can simply do ray up cluster.yaml to launch the nodes and create a Ray cluster.
Then you can do ray attach cluster.yaml to ssh into the head node of your Ray cluster.
The great thing about the cluster launcher is that it will automatically add new nodes if more resources are requested than the current cluster has available. Also, if there are idle nodes, Ray will automatically terminate them.
LinkPutting it all together
Now let’s see how we can put everything together and easily train a simple MNIST Classifier on the cloud.
LinkPackage Installation
First let’s install Ray Lightning using:
1pip install ray-lightningThis will also install PyTorch Lightning and Ray for us.
LinkVanilla PyTorch Lightning
First step is to get our PyTorch Lightning code ready. We first need to create our classifier model which is an instance of LightningModule. Here is an example of a simple MNIST Classifier adapted from the PyTorch Lightning guide:
1import pytorch_lightning as pl
2import torch
3from torch.utils.data import random_split, DataLoader
4from torchvision.datasets import MNIST
5from torchvision import transforms
6
7class LightningMNISTClassifier(pl.LightningModule):
8    def __init__(self, config, data_dir=None):
9        super(LightningMNISTClassifier, self).__init__()
10
11        self.data_dir = data_dir
12        self.lr = config["lr"]
13        layer_1, layer_2 = config["layer_1"], config["layer_2"]
14        self.batch_size = config["batch_size"]
15
16        # mnist images are (1, 28, 28) (channels, width, height)
17        self.layer_1 = torch.nn.Linear(28 * 28, layer_1)
18        self.layer_2 = torch.nn.Linear(layer_1, layer_2)
19        self.layer_3 = torch.nn.Linear(layer_2, 10)
20        self.accuracy = pl.metrics.Accuracy()
21
22    def forward(self, x):
23        batch_size, channels, width, height = x.size()
24        x = x.view(batch_size, -1)
25        x = self.layer_1(x)
26        x = torch.relu(x)
27        x = self.layer_2(x)
28        x = torch.relu(x)
29        x = self.layer_3(x)
30        x = F.softmax(x, dim=1)
31        return x
32
33    def configure_optimizers(self):
34        return torch.optim.Adam(self.parameters(), lr=self.lr)
35
36    def training_step(self, train_batch, batch_idx):
37        x, y = train_batch
38        logits = self.forward(x)
39        loss = F.nll_loss(logits, y)
40        acc = self.accuracy(logits, y)
41        self.log("ptl/train_loss", loss)
42        self.log("ptl/train_accuracy", acc)
43        return loss
44
45    def validation_step(self, val_batch, batch_idx):
46        x, y = val_batch
47        logits = self.forward(x)
48        loss = F.nll_loss(logits, y)
49        acc = self.accuracy(logits, y)
50        return {"val_loss": loss, "val_accuracy": acc}
51
52    def validation_epoch_end(self, outputs):
53        avg_loss = torch.stack([x["val_loss"] for x in outputs]).mean()
54        avg_acc = torch.stack([x["val_accuracy"] for x in outputs]).mean()
55        self.log("ptl/val_loss", avg_loss)
56        self.log("ptl/val_accuracy", avg_acc)
57
58    def prepare_data(self):
59        self.dataset = MNIST(
60            self.data_dir,
61            train=True,
62            download=True,
63            transform=transforms.ToTensor())
64
65    def train_dataloader(self):
66        dataset = self.dataset
67        train_length = len(dataset)
68        dataset_train, _ = random_split(
69            dataset, [train_length - 5000, 5000],
70            generator=torch.Generator().manual_seed(0))
71        loader = DataLoader(
72            dataset_train,
73            batch_size=self.batch_size,
74            num_workers=1,
75            drop_last=True,
76            pin_memory=True,
77        )
78        return loader
79
80    def val_dataloader(self):
81        dataset = self.dataset
82        train_length = len(dataset)
83        _, dataset_val = random_split(
84            dataset, [train_length - 5000, 5000],
85            generator=torch.Generator().manual_seed(0))
86        loader = DataLoader(
87            dataset_val,
88            batch_size=self.batch_size,
89            num_workers=1,
90            drop_last=True,
91            pin_memory=True,
92        )
Then we need to instantiate this model, create our Trainer and start training.
1model = LightningMNISTClassifier(config, data_dir="./")
2
3trainer = pl.Trainer( max_epochs=10)
4trainer.fit(model)
And that’s it for single threaded execution - you can now train your classifier on your laptop. Now let’s parallelize across a large cluster using GPUs with the Ray Lightning Plugin.
LinkParallelizing on Laptop with Ray Lightning
To use Ray Lightning, we simply need to add the RayPlugin to our Trainer.
Let’s first see how we can parallelize training across the cores of our laptop by adding the RayPlugin. For now, we will disable GPUs. To go straight to parallel training on a cluster with GPUs, head on over to the next section.
1from ray_lightning import RayPlugin
2
3class LightningMNISTClassifier(...):
4   # ... etc
5
6# variables for Ray around parallelism and hardware
7num_workers = 8
8use_gpu = False
9
10# Initialize ray.
11ray.init()
12
13model = LightningMNISTClassifier(config, data_dir)
14
15trainer = pl.Trainer(
16    max_epochs=10,
17    plugins=[RayPlugin(num_workers=num_workers, use_gpu=use_gpu)])
18trainer.fit(model)
And with just those small changes, we can run the script again, except have training parallelized with 8 workers (i.e. 8 processes).
For this, you will need a Ray cluster though. Let’s see how to do that.
LinkMulti-node Training on a Ray Cluster
To leverage multiple GPUs, and possible multiple nodes for training, we just have to use the Ray cluster launcher with the RayPlugin.
First, we start up the Ray Cluster by following the instructions above
1ray up cluster.yamlFor a full step-by-step guide with all the possible configurations you can add to your YAML file you can check out the instructions here.
Make sure to add your training script to the file_mounts section and any pip dependencies as part of the setup_commands.
Once your cluster has started, then you can ssh into the head node via
1ray attach cluster.yaml
2
You should see your training script synced on this head node since you added to the file_mounts of your cluster.yaml.
Now you just take the same code from the previous section, and make 2 changes:
ray.init()->ray.init(“auto”)so Ray knows to connect to the cluster instead of just starting a local instanceIn the code snippet, set
use_gputo True andnum_workersto be the number of total processes/GPUs you want to use for training.
And final step is to just run your Python script:
1python train.pyAnd that’s it! You should be seeing the GPUs in your cluster being used for training.
You’ve now successfully run a multi-node, multi-GPU distributed training job with very few code changes and no extensive cluster configuration!
LinkNext steps
You’re now up and running with multi-GPU training on your cloud of choice.
But Ray Lightning comes with many more features:
If standard PyTorch DDP is not your cup of tea, try out these alternatives instead:
RayHorovodPlugin: utilizes Horovod for the underlying distributed training protocol instead of DDP.
RayShardedPlugin: memory efficient model parallel training with Fairscale.
Ray Lightning also integrates with Ray Tune allowing you to run distributed hyperparameter tuning experiments with each training run also run in a parallel fashion. Check out the full Ray+PyTorch Lightning E2E guide for more details.
Use Ray Client to do training on the cloud without ever having to leave your laptop. More details here.
And if you’re curious to learn more about what the entire Ray ecosystem can offer you can check out these guides:
Happy training, and may your model's error always be low! :)


